With Spreadsheet Reader, you can create shortcodes to display your Google Sheets data on your WordPress site. Follow these steps to generate a shortcode:
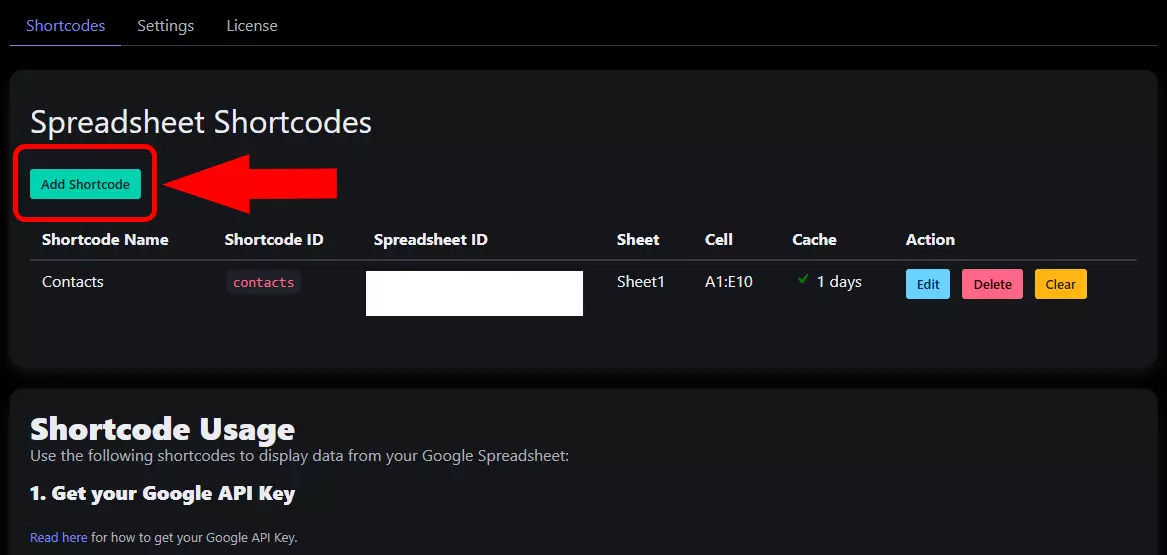
Step 1: Go to the Settings Page
- Navigate to WordPress Dashboard → Settings → Spreadsheet Reader
- Click the “Add Shortcode” button to open the shortcode creation popup.
Step 2: Fill in the Required Fields
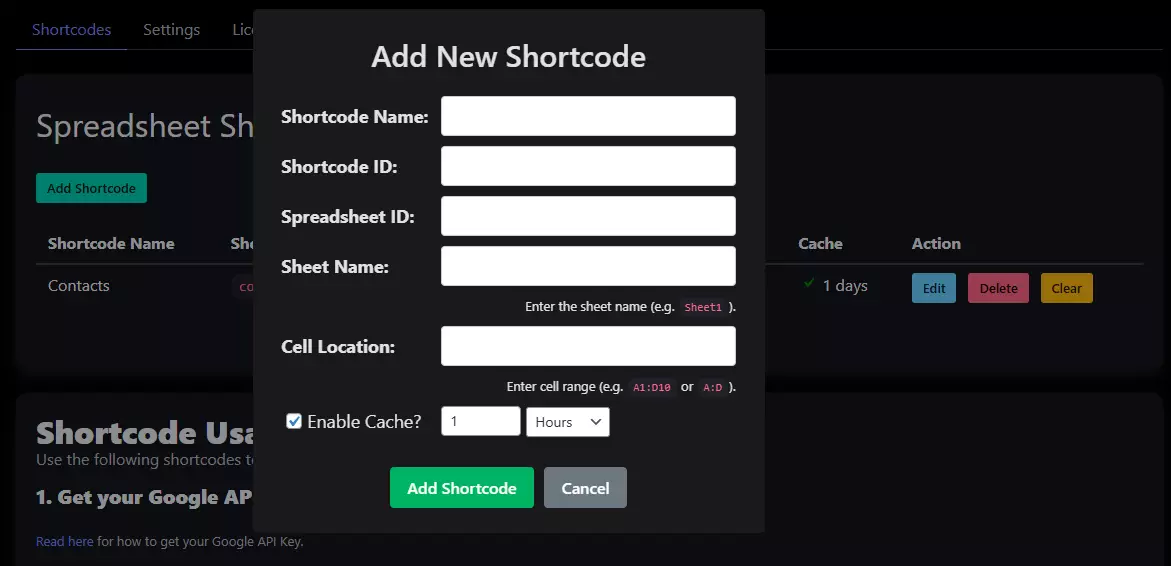
In the popup, enter the following details:
- Shortcode Name – Give your shortcode a name.
- Shortcode ID – A unique identifier for your shortcode. This name will be used to call the shortcode in your posts/pages.
- Spreadsheet ID – The unique ID of your Google Sheet. Click here to learn how to get the Spreadsheet ID.
- Sheet Name – The exact name of the sheet (tab) within your Google Spreadsheet (e.g.,
Sheet1). - Cell Location – Define the cell range to be fetched (e.g.,
A1:Z100). - Enable Cache? – Check this box to enable caching, which helps reduce API calls and improves performance.
Step 3: Cache Duration Recommendations
Caching stores the spreadsheet data temporarily to prevent excessive API requests. The cache duration depends on how often your data changes.
Suggested Cache Durations:
- For frequently updated data (e.g., flash sales pricing, news headlines, weather updates) → Set cache duration to 1-30 minutes.
- For daily updates (e.g., reports, schedules) → Set cache duration to 1–6 hours.
- For rarely changing data (e.g., static reference tables, product catalogs) → Set cache duration to 1 day or more.
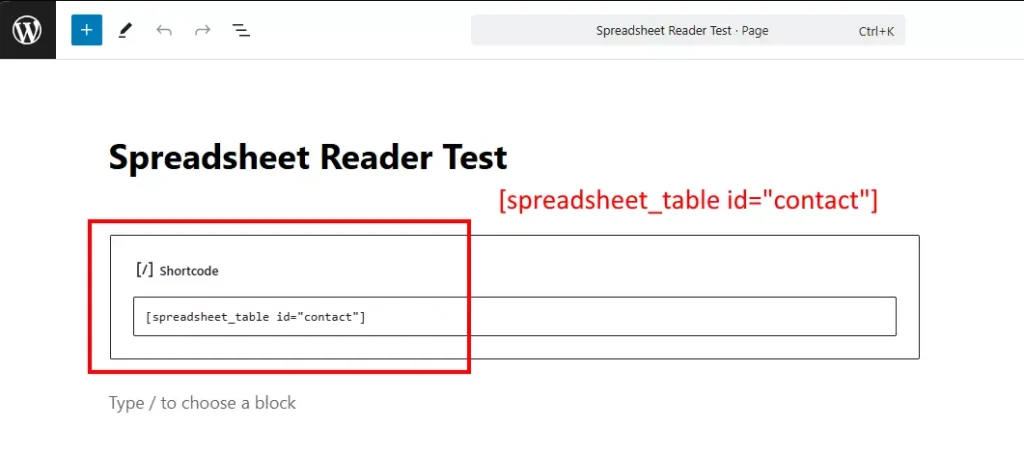
Step 4: Using the Shortcode
Once added, you can use the shortcode in your posts, pages, or widgets.
[spreadsheet_table id=”YOUR_SHORTCODE_ID” col_limit=”0″ row_limit=”0″]
- spreadsheet_table → Show data as table.
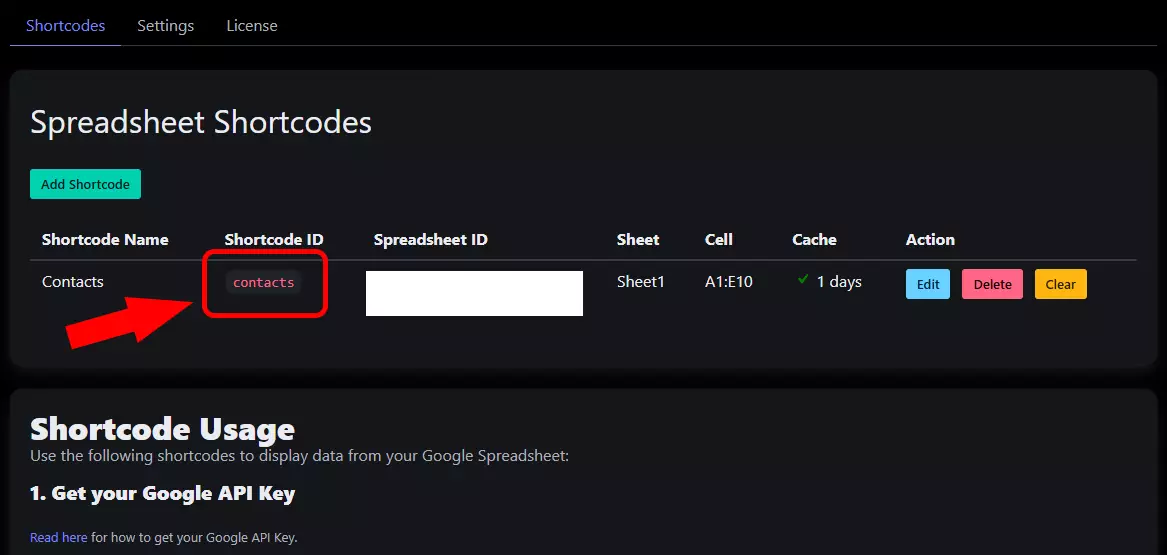
- id: Shortcode ID you created (e.g.,
contact). - col_limit: Limit the columns (set “0” to unlimit column).
- row_limit: Limit the rows (set “0” to unlimit row).
- limit: This attribute determines the number of items (rows or columns) that will be displayed on each page. To activate pagination, limit must be greater than 0.
- For row-based sorting (default), the
limitcontrols how many rows are shown per page. - For column-based sorting (when
sort="column"), thelimitcontrols how many columns are displayed per page.
- For row-based sorting (default), the
- sort: This attribute defines the direction of pagination:
- sort=”row” (default) – Pagination will be based on rows.
- sort=”column” – Pagination will be based on columns.
- page: (Optional) Set specific page number manually.
- name: (Optional) Custom name for pagination query string (e.g.,
name="contacts"→?contacts_page=2). - class: (Optional) Add custom CSS class to the table element.
- navigation: (Optional) Show pagination links:
trueorfalse(default).Limitmust be greater than 0.
Example:
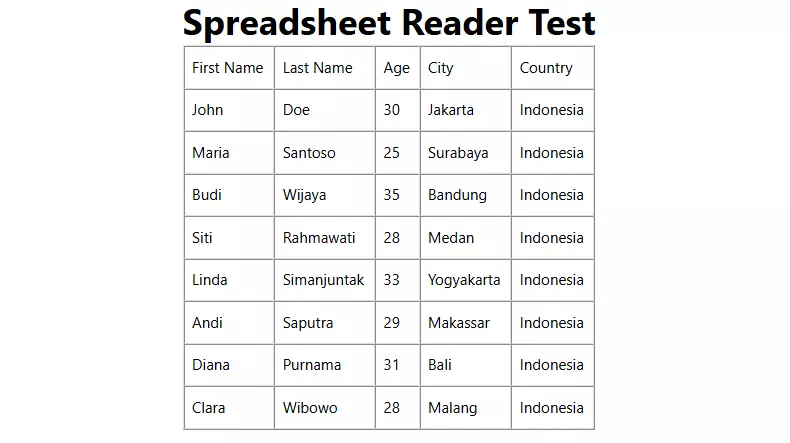
[spreadsheet_table id="contact" col_limit="3" row_limit="5"]
If col_limit="3" and row_limit="5", the table will display only the first 3 columns and 5 rows of data.
Example 2:
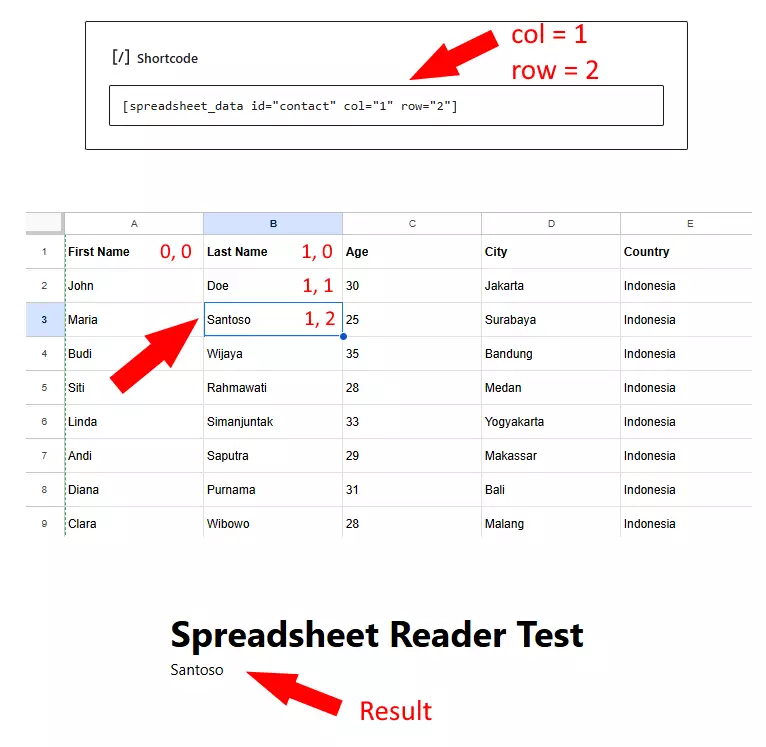
Fetch a Single Data Cell:
To fetch single data (or single cell), use this shortcode:
[spreadsheet_data id=”YOUR_SHORTCODE_ID” col=”0″ row=”0″]
- spreadsheet_data → Show data as a single value in specific row & column.
- id: Shortcode ID you created (e.g.,
contact). - col: Column in your data range (index starts from 0).
- row: Row in your data range (index starts from 0).
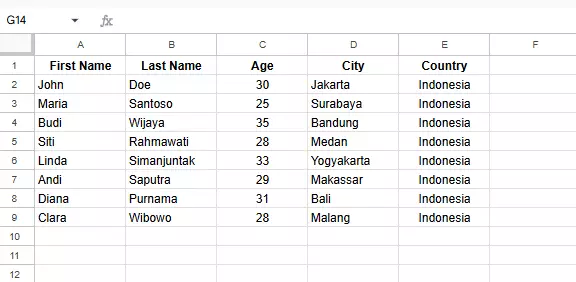
Understanding Column & Row Index:
If your selected range is A1:E9, then:
col=0, row=0→ refers to A1col=1, row=0→ refers to B1col=0, row=1→ refers to A2
(See illustration below for column & row indexing.)
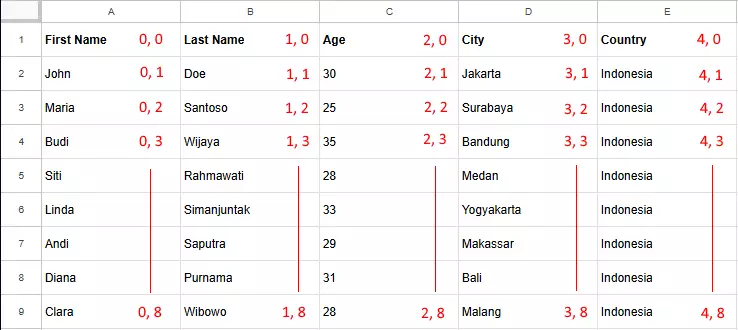
Example 1:
- Column 0, Row 0 → A1 (“First Name”)
- Column 1, Row 0 → B1 (“Last Name”)
- Column 0, Row 1 → A2 (“John”)
- Column 1, Row 1 → B2 (“Doe”)
- Column 2, Row 3 → C4 (“35”)
Example 2:
Important Notes
Pagination with Unlimited Ranges
When using the [spreadsheet_table] shortcode with pagination enabled (i.e., using the limit attribute), be aware of how your spreadsheet range is defined.
If your defined range is open-ended or unlimited — for example, "A:Z" — the plugin cannot automatically detect the total number of pages because the actual data length is unknown. As a result, the “Next Page” button will always appear, even if there are no more rows of data left to display.
To avoid this behavior, we recommend the following:
- Use a fixed range such as
"A1:Z100"if you know the expected number of rows. - Alternatively, manually monitor your spreadsheet content to ensure no unexpected blank rows are present.
- You may also programmatically handle the pagination on your own if you are using the data in a more advanced setup like a custom theme or builder.
This limitation is due to the way Google Sheets API handles open-ended ranges — it does not return the full length unless specifically queried.
How col_limit and row_limit Work with Pagination (limit > 0)
When using the [spreadsheet_table] shortcode in pagination mode (i.e., when the limit attribute is greater than 0), please be aware of how col_limit and row_limit behave based on the sort type:
- If
sort="row"(default):- limit controls how many rows are shown per page.
- row_limit is ignored.
- col_limit is still respected and limits the number of columns displayed.
- If
sort="column":- limit controls how many columns are shown per page.
- col_limit is ignored.
- row_limit is still respected and limits the number of rows displayed.
In summary:
col_limit and row_limit can still be used to limit what’s displayed, but only the attribute that doesn’t match the sort will apply.
Use limit to control pagination based on the selected sort direction (row or column).