If you’re looking to install n8n, you’re in the right place! n8n is a powerful open-source automation tool that allows you to connect different applications and automate workflows, making it an excellent choice for developers who want to run an automation server locally or on a private VPS. At Kotak Digital, we believe in empowering developers with useful tools, and this guide will help you set up n8n using Docker, a popular platform for developing, shipping, and running applications in containers.
Table of Contents
What is n8n?
n8n is a fair-code licensed tool, meaning that you can self-host it and have full control over your data. It supports a vast array of integrations with various services, making it highly versatile. In this guide, we’ll walk you through the step-by-step process of setting up n8n using Docker, which completely simplifies deployment.
Why Use Docker for n8n?
Using Docker for your n8n setup has several advantages:
- Isolation: Docker containers allow you to run applications in isolated environments, preventing conflicts with other software.
- Scalability: Easily scale n8n to handle more load by deploying additional containers.
- Portability: Move your n8n setup effortlessly between different machines or cloud providers.
- Version Control: Quickly switch between different versions of n8n or its dependencies.
Now that you know why Docker is a great choice for n8n, let’s dive into the installation process.
Prerequisites
Before you start, make sure you have the following:
- Docker Desktop installed and running on your machine (Windows/Mac).
- A working internet connection.
- An email address (for receiving your n8n license key).
Step-by-Step Installation Guide
Step 1: Pull the n8n Docker Image
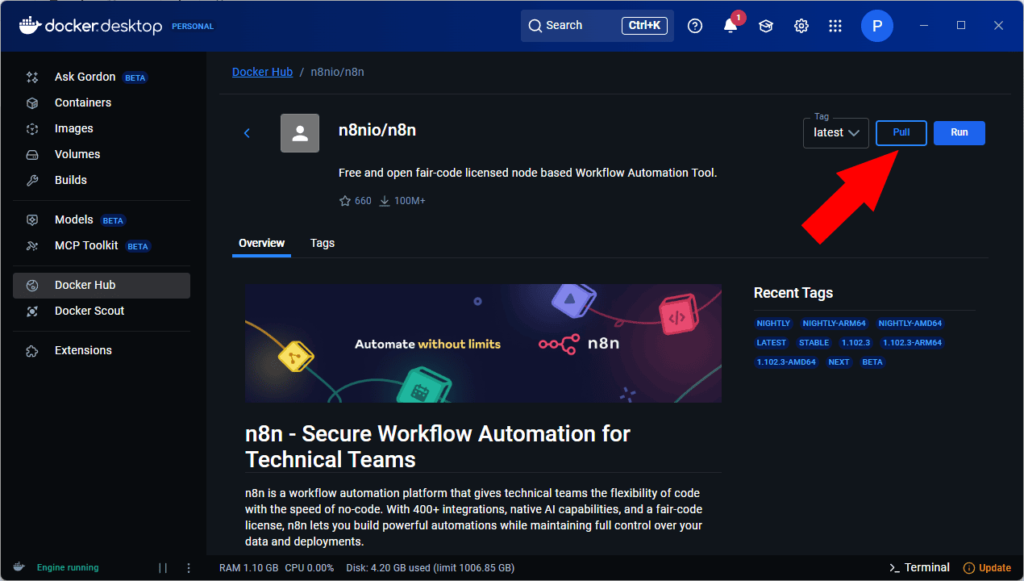
If you are using Docker Desktop,
- go to the Docker Hub menu
- search for “n8n” in the search box
- select n8nio/n8n
- click Pull
Docker will download the latest n8n image from Docker Hub.
Or you can open your terminal and run the following command to pull the latest n8n Docker image:
docker pull n8nThis command downloads the official n8n Docker image from Docker Hub, ensuring you have the latest version.
Step 2: Create a Data Folder on Your Local Machine
n8n stores configuration and workflow data, so it’s good practice to persist this data by mounting a volume. Create a folder on your local disk, for example:
C:\n8n_dataor on macOS/Linux:
~/n8n_dataThis folder will be used to store n8n’s internal files (like credentials and workflows).
Step 3: Run the n8n Container
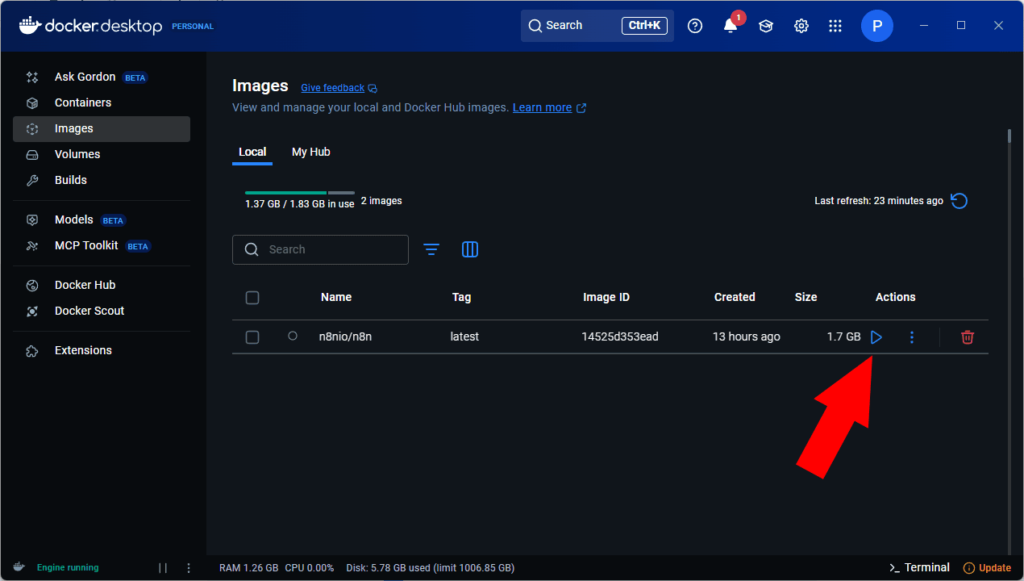
Once the image is pulled, go back to Docker Desktop:
- Go to the Images tab.
- Find the
n8nio/n8nimage. - Click the Run button.
In the “Run a container” window:
- Expand Optional Settings.
- Set the Container Name, e.g.,
n8n_local. - Under Ports, map the container port
5678to any available host port (usually also5678). - Under Volumes:
- Set Host Path to the folder you created earlier (
C:\n8n_dataor~/n8n_data). - Set Container Path to:
/home/node/.n8n
- Set Host Path to the folder you created earlier (
- Click Run to start the container.
Step 4: Access the n8n Web Interface
Open your web browser and go to:
http://localhost:5678You should see the n8n welcome screen.
Step 5: Register an n8n Account
Follow the on-screen instructions to create your n8n admin account. You’ll be asked for:
- Name
- Password
This account will be used to access and manage your workflows.
Step 6: Activate Your Free n8n License
After creating your account, n8n will prompt you to activate your license.
- Click the button to request a free license.
- Check your email inbox for a message from n8n.
- Paste the license key into the activation field.
Done! You now have access to the full feature set of n8n’s Community Edition.
Step 7: You’re Ready to Automate!
You can now start building workflows directly from the browser. Drag nodes, connect services, and automate repetitive tasks—all from your local machine.
💡 Bonus Tips
- To stop or restart the container, use the Containers tab in Docker Desktop.
- To run n8n persistently in the background, consider using Docker Compose or setting the container to restart automatically.
- Backup your
n8n_datafolder regularly.
Conclusion
Congratulations! You’ve successfully set up your own n8n automation server using Docker. You now have a robust tool in your arsenal that will help streamline your workflows and improve productivity.
At Kotak Digital, we are dedicated to helping developers like you find the best solutions for your projects. If you’re interested in learning more about WordPress development, plugins, or other automation tools, be sure to check out our website Kotak Digital for more educational content.
For further reading on automation tools and technologies, visit Wikipedia’s Automation page to understand the broader implications of automation in today’s digital landscape. Happy automating!